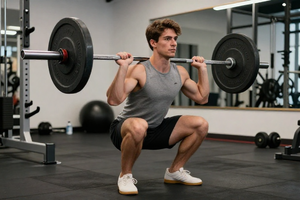

Stepping under the bar for the first time is a rite of passage. You’ve watched the videos, you’ve psyched yourself up, and you’re ready to squat. But as soon as you descend, a question freezes you mid-motion: How low am I supposed to go? It’s the most debated topic in gyms everywhere, and for beginners, it’s often the source of a critical mistake that can stall progress or lead to discomfort.
The problem isn’t a lack of effort. It’s a misunderstanding of what a squat is actually supposed to feel like. Many new lifters either cut the movement short out of fear or force themselves into a position their body isn’t ready for. Let’s clear up the confusion so you can squat with confidence and control.
The Classic Trap: Half-Reps and the Fear of Depth
The most common mistake beginners make with squat depth is consistently squatting above parallel—what’s often called a half-rep or a quarter-squat. This usually happens for one of two reasons: a fear of being stuck at the bottom (the infamous “butt wink” or a feeling of tipping over) or a belief that a shallower squat is safer for the knees.
While it’s true that you should never force range of motion, chronically stopping short cheats your muscles of the stimulus they need to grow. A full range of motion—generally meaning your hip crease drops below the top of your knee—recruits more muscle fibers across your glutes, hamstrings, and quads. Cutting that range short is like reading only the first chapter of a book and claiming you finished it.
Correction cue: Instead of thinking about how low you’re going, think about sitting back and down as if you’re reaching for a low stool behind you. Your knees should track in line with your toes, not cave inward.
Why “Ass to Grass” Isn’t the Right Goal for Everyone
On the flip side, another common mistake is obsessing over maximum depth—the “ass to grass” standard. Beginners who push for this without the necessary ankle mobility, hip flexibility, or core stability often end up with their lower back rounding at the bottom (a technique flaw called a butt wink). This places shear forces on the lumbar spine that your body isn’t ready to handle.
Full depth is a worthy long-term goal, but it’s not a starting point. The real mistake is treating squat depth like a pass/fail test. Instead, treat it as a range you gradually expand over weeks and months.
How to find your working depth
- The box squat test: Place a plyo box or bench behind you at a height where your thighs are roughly parallel to the floor. Sit all the way back onto it, pause for a moment, then drive up through your heels. This removes the fear of falling and teaches you to load your hips and glutes.
- The goblet squat drill: Hold a dumbbell or kettlebell at your chest. This counterbalance shifts your center of gravity forward slightly, making it easier to keep your torso upright while you descend deeper. It’s the best drill for improving your squat pattern without a barbell on your back.
Mobility vs. Stability: A Deeper Look at the Real Issue
When beginners struggle with depth, the immediate assumption is tightness. They reach for foam rollers and stretches, desperately trying to loosen their hips. While limited ankle dorsiflexion and hip flexion can be contributing factors, the more common hidden problem is a lack of core and trunk stability.
If your deep core muscles can’t stabilize your pelvis as you descend, your body will instinctively cut the squat short to protect your spine. The fix isn’t always more stretching; sometimes it’s practicing a better brace. Before each rep, take a deep belly breath, hold it tight like you’re about to take a punch, and keep that tension through the entire movement. This locked-in position gives you the structural support to go deeper safely.
A quick mobility check
If you suspect ankle mobility is limiting you, try this: stand facing a wall, with your toes about four inches from the base. Keeping your heel flat on the ground, try to touch your knee to the wall. If you can’t do it without your heel lifting, your ankle mobility likely needs some work. Adding a small plate under your heels as a temporary lift can help you find depth while you work on mobility separately.
How to Avoid the Mistake: A Practical Progression
Forget about a specific number of inches or a visual cue from the mirror. Instead, focus on a gradual, honest progression.
- Start with the goblet squat. Use it as your warm-up for the first 4-6 weeks of your training. Go only as deep as you can while keeping your lower back neutral. Film yourself from the side.
- Use a tempo. Count “one thousand one, one thousand two” on the way down. This forces you to control the descent rather than dive-bombing or bouncing at the bottom.
- Gradually lower your box. If you started with a 16-inch box for box squats, eventually work down to a 14-inch box. Small increments make depth improvements feel easy.
You don’t need to squat deep to get a great workout—but you do need to own the depth you use. The mistake isn’t about being at a specific angle; it’s about avoiding the challenge. A controlled, deep squat builds strong hips, resilient knees, and a bulletproof core. Give yourself permission to work for it slowly.