Pizza night just got a seasonal upgrade. Bakers and home cooks alike are discovering that cooked winter squash—think butternut, kabocha, or even pumpkin—can replace the bulk of gluten-free flour blends in a quick pizza dough. The result is a tender, subtly sweet crust that holds together without the gumminess some gluten-free mixes produce. Here's how to make the swap and what you need to know before you start.
Why squash works in gluten-free dough
Gluten-free doughs often struggle with structure and moisture. Squash solves both problems. When roasted or steamed, squash breaks down into a smooth purée that acts as a natural binder, reducing the need for eggs or xanthan gum. Its starch content adds flexibility, and its natural sugars help the crust brown without burning. The moisture in squash also means you can use less liquid overall, which makes the dough easier to handle.
A good rule: replace half the gluten-free flour in your usual recipe with an equal weight of squash purée. Adjust the remaining liquid from there.
Which squash to pick
Not all squash are created equal for dough. You want varieties with dense, low-moisture flesh. Butternut squash is a reliable choice because it’s widely available and has a smooth, non-stringy texture after cooking. Kabocha, sometimes called Japanese pumpkin, is even starchier and gives the dough a slightly sweet, chestnut-like flavor. Acorn squash works too, but its higher water content means you'll need to drain or cook it a little longer to concentrate the flesh.
Avoid watery types like yellow summer squash or zucchini unless you plan to squeeze out the liquid thoroughly—they’ll make the dough too slack.
How to prep the squash for dough
You have two good paths here. The first is roasting: halve the squash, scoop out the seeds, and place the halves cut-side down on a baking sheet. Roast at 400°F (200°C) for about 40 minutes, until fork-tender. Let it cool, then scoop the flesh into a food processor and purée until completely smooth. The second method is steaming: peel and cube the squash, steam for 15–20 minutes, then mash or blend. Steaming retains slightly more moisture, so you may need to drain the purée in a fine-mesh sieve for a few minutes before mixing.
Whichever method you choose, spread the purée on a plate and let it cool to room temperature before adding it to your dough. Hot purée can activate the yeast too early or make the fats separate.
The basic ratio for squash pizza dough
Start with a base that bakers have tested in home kitchens:
- 1 cup (about 220 g) squash purée
- 1 cup (120 g) gluten-free all-purpose flour (a blend with rice flour, tapioca starch, and potato starch works best)
- 1 teaspoon instant yeast (or ½ teaspoon more if your kitchen is cool)
- ½ teaspoon salt
- 1 tablespoon olive oil (plus more for hands and pan)
- 1 teaspoon honey or maple syrup (optional, but helps browning)
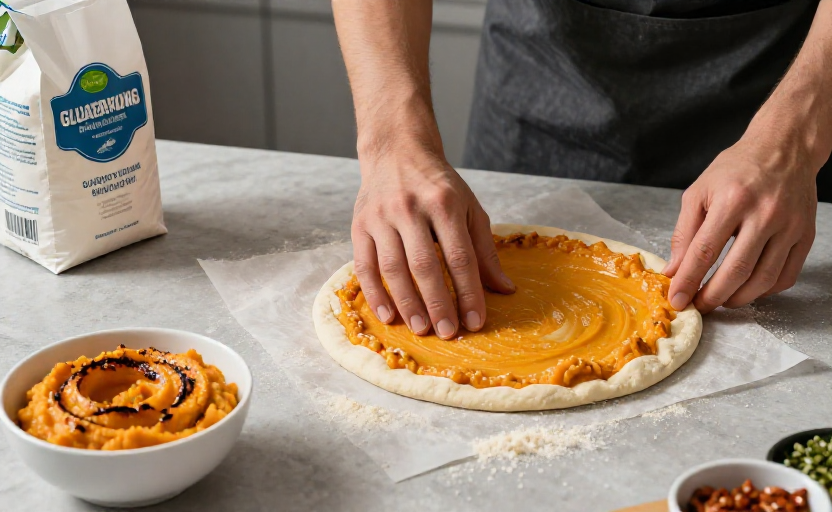
Mix the dry ingredients in one bowl. In another, stir together the squash purée, oil, and sweetener. Combine the wet and dry mixtures, then knead gently with lightly oiled hands until a soft, slightly tacky dough forms. If it’s too sticky to handle, add flour one tablespoon at a time. If it’s too dry, add water by the teaspoon. Let the dough rest for 10 minutes—this gives the gluten-free flours time to absorb moisture.
Tips for rolling and baking
Because squash dough is softer than traditional wheat dough, it’s best to press it out directly on a piece of parchment paper dusted with gluten-free flour or cornmeal. Use your fingertips to push the dough from the center outward, aiming for an even ¼-inch thickness. If the edges crack, dab them with a little water and smooth them over.
Bakers recommend a hot oven for a crisp crust: preheat to 450°F (230°C) with a pizza stone or inverted baking sheet inside. Slide the parchment with the dough onto the hot surface and bake for 7 minutes without toppings. Then add sauce, cheese, and any other toppings, and bake another 8–12 minutes until the bottom is golden and the cheese bubbles.
Variations to try
Once you’re comfortable with the basic dough, you can experiment. Swap the gluten-free flour for a 50-50 blend of almond flour and tapioca starch for a grain-free version. Add dried rosemary, garlic powder, or a pinch of smoked paprika into the dry ingredients for extra flavor. For a sweeter crust—think dessert pizza with ricotta and honey—use kabocha purée and skip the salt.
Common questions about squash pizza dough
Can I use canned pumpkin purée?
Yes, but check the label. You want 100% pumpkin, not pumpkin pie filling with added sugar and spices. Canned purée is usually thicker than fresh-roasted squash, so you may need to add a tablespoon or two of water to reach the right consistency.
Does the dough freeze well?
It does. After mixing, shape the dough into a flat disc, wrap tightly in plastic wrap, and freeze for up to three months. Thaw overnight in the fridge, then bring to room temperature before pressing out.
Why did my dough turn out sticky?
Two likely reasons: the squash purée was too wet, or the gluten-free flour blend you used has a high proportion of starches. Next time, drain the purée in a sieve lined with cheesecloth for 15 minutes before mixing. You can also swap in a flour blend with more whole-grain gluten-free flours, like brown rice or sorghum, which absorb more moisture.
Can I use this recipe for calzones?
Yes. The dough is pliable enough to fold. Roll it into a 6-inch circle, add filling to one half, fold over, and crimp the edges with a fork. Bake at the same temperature for about 15 minutes total, flipping halfway through for even browning.