For many people living with diabetes, the feet are where small problems can quickly become serious. High blood sugar over time can damage nerves (a condition called neuropathy) and reduce blood flow, meaning a minor blister, cut, or callus might go unnoticed until it has become an infection. The good news is that a simple, regular foot check at home can catch these early warning signs before they escalate. This isn't about making a medical diagnosis—it is about learning what to look for so you know when to call your doctor.
Think of this five-minute routine as a maintenance check for one of the most hardworking parts of your body. Here is exactly how to examine your feet for the early changes that diabetes can cause, along with the specific signs that warrant a professional visit.
Why daily foot checks matter with diabetes
Peripheral neuropathy often begins with subtle symptoms: a slight tingling, a feeling of walking on pebbles, or a loss of sensation in the toes. Without that normal pain signal, you might step on a sharp object or develop a hot spot from an ill-fitting shoe and not realize anything is wrong. Reduced circulation also means that even a small wound takes longer to heal. By checking your feet every day, you shift from being reactive (waiting for pain) to being proactive (spotting changes early).
What you need before you start
Gather a few items before you begin:
- A hand mirror or a long-handled inspection mirror (to see the bottoms of your feet)
- Good lighting—natural daylight or a bright lamp
- A small flashlight for checking between toes
- A soft washcloth or cotton ball if you need to test sensation
Step-by-step foot examination
1. Wash and dry thoroughly
Start with clean feet. Use warm (not hot) water—test it with your elbow first if you have reduced sensation in your hands or feet. Dry gently but completely, especially between each toe. Moisture left behind creates a perfect environment for fungal infections like athlete's foot. If your skin is dry, apply a thin layer of unscented lotion to the tops and bottoms, but avoid putting lotion between the toes.
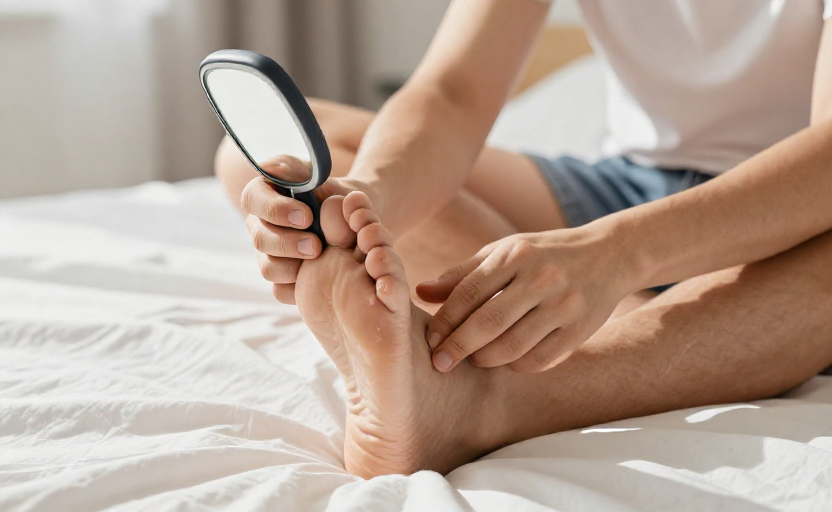
2. Inspect the tops and bottoms
Place your foot on your opposite thigh. Use the mirror to see the bottom of your foot, or bring your foot up close if you are flexible enough. Look for:
- Cuts, scrapes, or blisters — even tiny ones
- Redness or swelling — a sign of irritation or pressure
- Calluses and corns — thick skin can break down and ulcerate underneath
- Blisters or blood spots under a callus
- Dry, cracked skin especially on the heels
3. Examine between every toe
This area is easy to overlook. Use the flashlight to look for peeling skin (a fungal infection sign), soft white patches, or small breaks in the skin. If you cannot see well, ask a family member for help.
4. Check the nails
Look for ingrown toenails, thickening, discoloration (yellow or brown can indicate fungus), or rough edges that could snag on socks. Trim nails straight across and file gently—never cut into the corners.
5. Feel for temperature and sensation changes
Run your hand across your foot. Is one foot noticeably warmer than the other? A localized warm spot may signal inflammation or infection. Next, gently touch different areas of your foot with the cotton ball or your fingertip—heel, arch, ball, big toe, little toe. If you cannot feel the touch in certain spots, or if it feels dull or pins-and-needles, note that area. This is how neuropathy often first reveals itself.
6. Evaluate your shoes and socks
Before you put your socks and shoes back on, turn them inside out. Shake out any pebbles or debris. Check the seams of your socks—do not wear socks with thick, rough seams. Feel inside your shoes for loose linings, rough edges, or objects. Shoes that are too tight or too loose are a leading cause of friction blisters.
A quick tip: If you find it hard to bend over, try propping your foot on a low stool or the edge of the tub. Many people also use a mirror positioned on the floor.
Specific early warning signs that need medical attention
Some changes are subtle but important. If you notice any of the following, contact your primary care doctor or a podiatrist within a day or two, not weeks from now:
- A blister that does not have clear fluid (bloody or cloudy)
- Any open sore that does not heal within 24 hours of proper cleaning
- Red streaks extending from a wound (a sign of spreading infection)
- Sudden swelling or redness in one foot but not the other
- A warm spot that feels hot to the touch compared to surrounding skin
- Any drainage or odor from between toes or from a cut
- Black or blue discoloration of a toe or part of the foot
What is a foot ulcer exactly and why is it serious?
A foot ulcer is a full-thickness wound that goes through the skin. In people with diabetes, these often start as a blister or callus that becomes neglected. Because of poor circulation and neuropathy, the ulcer may not hurt, so people keep walking on it, making it worse. Ulcers are the most common reason for diabetes-related hospitalizations, and they can lead to serious infection or even amputation if not treated aggressively. This is why that daily check matters—catching a blister before it becomes an ulcer is the goal.
When to see a podiatrist for regular care
Beyond daily self-checks, everyone with diabetes should see a podiatrist (foot doctor) at least once a year for a comprehensive foot exam. That exam includes testing sensation with a monofilament (a thin nylon fiber) and checking pulses in your feet to assess blood flow. If you already have neuropathy, calluses, or a history of ulcers, your podiatrist may want to see you every two to three months.
You do not need to be an expert in wound care. Your role is simply to be the lookout: inspect, feel, and report changes. Your healthcare team can handle the rest. The five minutes you spend each day checking your feet is one of the most effective things you can do to prevent complications and keep doing what you love.